Posted tagged ‘MC’

Making a simple Motion Tween using script

August 8, 2008

Okey, this isn’t really a real motion tween, but it will basically do the same thing. It’s simple, as simple as it can get, almost….

So, I’m gonna teach you how to make a motion tween using script, and I will also learn you how to do a play and pause button for it. So, go on to step one, now!

STEP 1:

Well, let’s begin by looking at the first frame in the movie. It’s empty, for now. But soon, it won’t be. Begin with creating two buttons. They do not need any instance names. The first button should be a play button, the second one should be a pause button. Another thing you could do is to add a MC, no instance name this time either. Now, a last thing to do at this step, add the following code to the first frame!

playpause=2; //The tween is paused, change to 1 to have it play as default

STEP 2:

Now, you got two buttons. You need to add some code on them, of course. If there’s some new commands in the code, read it until you do understand the code, and don’t just copy/paste.

This one is for the play button:

on(release){ //When you release the button
_root.playpause=1; //Set the variable to 1 (play)
}

And here’s a code for the pause button:
on(release){ //When you release the button
_root.playpause=1; //Set the variable to 2 (pause)
}

Good, but there’s still the most important part missing. Take a look at step 3!

STEP 3:

Let’s finish it! You need to add some code to the MC, or it won’t work. The code you need is basically simple, and if you know how to use variables, you should have no problem to modify it. And anyway, there’s descriptions for every line with any commands.

onClipEvent(load){ //When MC have been loaded
speed=5; //Set the speed of the motion tween
startx=100; //Set the X starting position
starty=100; //Set the Y starting position
endx=220; //Set the X final position
endy=300; //Set the Y final position
}
onClipEvent(enterFrame){//When you enter the frame, this code will run itself over and over again
if(_root.playpause===1){//1 is play, pause is 2. It must be on play.
if(this._x< to >)
this._x+=speed;//The MC X axis will go higher
}
if(this._y< to >)
this._y+=speed;//The MC Y axis will go higher
}
}
}

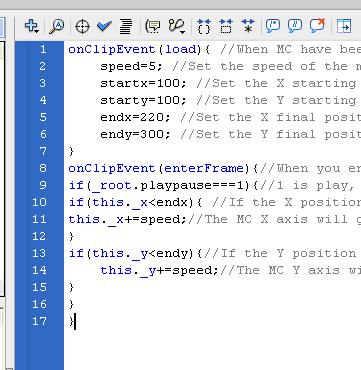
WORDPRESS DIDN’T LIKE SOME PARTS OF THE CODE (line 10 and 13), HERE’S A WORKING ONE!

Only 17 lines! And it’s still working! In total, you used 24 lines(!), and the result is a tween using script, with a play and pause button too!

Oh yeah, maybe you can use this for something, I have no idea if you can find something to do with it, but if you use it, feel free to post links!
The simple hitTest code, explained, and a lil’ bit improved.

August 5, 2008

Hi, I’ve seen many questions by many beginners asking about hitTest. Their questions are usualy about some simple hitTest codes, and I’m gonna explain for you how everything works in this tutorial.

WHAT IS HITTEST?

hitTest is a command used in actionscript to check if one object touches another. This is a very well used code, as it’s used in about every game. It can be used to create walls, powerups, traps or anything else that will do any command when the specified object touches it.

SO, WHAT’S THE CODE?

Um, no copy/paste, ok? This tutorial is meant for teaching you, if you copy/paste, you might get the code, but you will NOT understand it!

But the code is still here, and it’s explained too. It should be put on the enemy MC.

onClipEvent (enterFrame) { //When you enter the frame, code will run itself over and over again.
if (this.hitTest(_root.player)) { //Checks if it touches the player MC, in case it does, the following command will be executed...
_root.life -= 15;//You'll lose 15 health
}
}

Now, this isn’t the code I use normally, as it only checks the object rectangle, which means, if your MC is any other shape than a rectangle, the hitTest will be oversensitive. If you want to see the object rectangle, click on a MC with the selection tool. You will now understand, the player doesn’t have to touch the actual object, only that rectangle. This is why that code is a bad code…

THE CODE I DO RECOMMEND:

Well, let’s look at a better code. Put it on the player MC this time. And, no copy/paste!

onClipEvent (enterFrame) {//When you enter the frame, code is running itself over and over again
if (_root.enemy.hitTest(_x, _y, true)) {//The better hitTest, it do actually check if it touches the actual shape! enemy is the instance of the enemy MC
_root.life -= 15;//You'll lose 15 health
}
}

Well, this code does the same thing, but on a better way! It will check if it touches the actual shape, not the object rectangle. The first hitTest is really bad, and it’s not really easier either. Use this one, I would say it’s better!

FUN: Making MC’s do some fun stuff (Part 2)

August 3, 2008

I’m just bored. That’s why I’ve been writting so much today. I’m already posting the 6th tutorial today. The blogs first day, lol. Anyway, this is the sequel to my previous FUN stuff post. Here, I’ll teach you some more fun stuff you can do!

PROJECT NUMBER 3: Making a MC fade out, and fade in, once, using script.

This was a cool experiment I did, try it out! You must first create a new MC of course. And then read trough this code, until you understand it, and THEN you’re allowed to copy/paste it. But not before you’ve finished that task. Here’s the code:

onClipEvent (load) {//When the MC loads
speed = 5;//Set the desired speed.
number = 0;//Number will go to 0
}
onClipEvent (enterFrame) {//When you enter the frame, this code will run itself over and over again.
if (number<100) {//If the number is less than 100
_alpha -= speed;//Alpha will go lower
number += speed;//Number will go higher
} else if (number>=100) {//But what if the number is 100 or more?
number = 200;//Sets "number" to 200
_alpha += speed;//Alpha will go up
number -= speed;//Number will go down
}
}

It’s really cool, try it out!

PROJECT NUMBER 4: Making something like an animation with script.

So, now I’ve added a few new commands onto the code. This do now acctually look like an animation, but it’s all made out of script!

onClipEvent (load) {//When the MC loads
speed = 5;//Set the desired speed for changing the alpha.
rot_speed= 15; //Set the desired speed for rotating
sca_speed= 0.5; //Set the desired speed for scaling the MC
number = 0;//Number will go to 0
}
onClipEvent (enterFrame) {//When you enter the frame, this code will run itself over and over again.
if (number<100) {//If the number is less than 100
_alpha -= speed;//Alpha will go lower
number += speed;//Number will go higher
} else if (number>=100) {//But what if the number is 100 or more?
number = 200;//Sets "number" to 200
_alpha += speed;//Alpha will go up
number -= speed;//Number will go down
}
this._rotation+=rot_speed;//This will make the MC rotate
this._xscale+=sca_speed;//This MC will get a higher x scale
this._yscale-=sca_speed;//This MC will get a higher y scale
}

BTW guys, if you like these “fun” tutorials, tell me and I’ll make more!

FUN: Making MC’s do some fun stuff (Part 1)

August 3, 2008

This is some fun things that AS2 beginners could try to experiment with.

PROJECT NUMBER 1: Rotating forever, with script

Really simple thing, let’s say, you want, for any reason make a rotating MC, without using shape tweens. And no, without making it FBF either. This is a simple code, that is easy to modify. You put it on a MC.

onClipEvent(load){ //when the MC loads
speed=5; //used to set the rotation speed
}

onClipEvent(enterFrame){ //when you enter the frame, code will run over and over again.
this._rotation+=speed; //Will make the MC rotate.
}

PROJECT NUMBER 2: Increasing in size, forever, using script

Now, we’ll do almost the same thing, but let’s make it increase in size!

onClipEvent(load){ //when the MC loads
speed=5; //used to set the resizing speed
}

onClipEvent(enterFrame){ //when you enter the frame, code will run over and over again.
this._xscale+=speed; //Will make the MC x axis increase in size.
this._yscale+=speed; //Will make the MC y axis increase in size.
}

THE END!

At least the end of part one! Look out for next part of this fun tutorial.